| Summary: Connecting an electric fence is straightforward when you follow the correct steps. First, select a powerful energizer based on fence size and animal type. Second, install at least three 6 to 8-foot grounding rods 10 feet apart for effective conductivity. Finally, connect and secure high-quality fence wire, ensuring proper insulation. |
An electric fence is an essential tool for protecting property, containing livestock, and deterring unwanted intruders. Unlike traditional fencing, which relies on physical barriers, an electric fence uses a high-voltage pulse to create a psychological deterrent. When set up correctly, it is highly effective, low maintenance, and long-lasting. However, to ensure its proper functionality, the installation process must be executed with precision. So, how to connect an electric fence?
Incorrect wiring, poor grounding, or an undersized energizer can lead to power loss, weak shocks, or even total failure. I will provide a detailed, step-by-step process for properly connecting an electric fence, ensuring reliable performance and optimal efficiency.
Whether you’re a first-time installer or looking to refine your skills, this guide will walk you through everything you need to know. For insights on whether Airedales are good off-leash, explore this comprehensive article.
Quick Fix FAQ Guide for Electric Fence Connection
| Issue | Quick Fix |
| No shock detected | Check grounding rods, ensure firm connections. |
| Weak voltage | Clear vegetation touching the wire. |
| Energizer not working | Verify power source (battery, AC, or solar). |
| Inconsistent power | Inspect wires for breaks or loose connections. |
| Shocks too strong | Adjust energizer settings or reduce output. |
Understanding the Basics of an Electric Fence
Before diving into the installation process, it’s essential to understand how an electric fence operates. The basic principle of an electric fence is circuit completion—the energizer sends a high-voltage electrical pulse through the fence wire. Discover the benefits of using a harness by reading this guide on should a Collie wear a harness.
When an animal or intruder touches the wire, they complete the circuit by standing on the ground, which is connected to the grounding system. This results in a short, safe, and memorable shock that discourages them from crossing the fence.
This system is particularly effective because it trains animals or intruders to avoid the fence without causing serious harm. Unlike barbed wire or wooden fencing, an electric fence provides psychological deterrence rather than physical restraint. This means that animals quickly learn to respect the boundary, reducing the chances of them attempting to escape or enter restricted areas.
Key Components of an Electric Fence
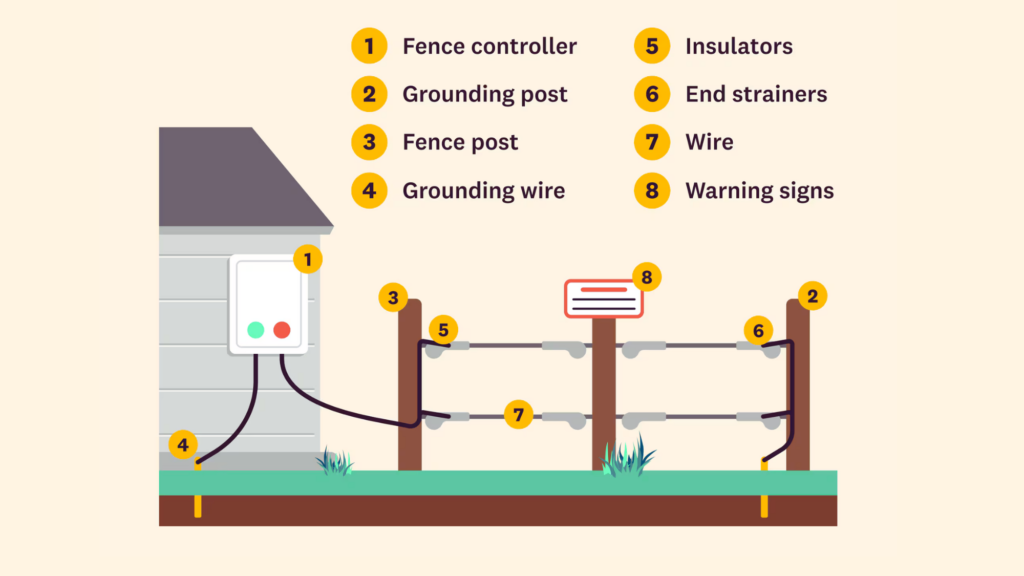
For an electric fence to function effectively, several critical components must be properly installed and connected. Each component plays a specific role in ensuring the fence remains electrified and delivers a reliable shock.
- Energizer (Charger): The heart of the electric fence system, responsible for sending electric pulses through the fence wire.
- Fence Wire: Conducts electricity along the perimeter of the fence.
- Grounding System: Provides a return path for electricity and ensures the circuit is completed.
- Insulators: Prevent electricity from leaking into fence posts, ensuring full voltage transmission.
- Fence Posts: Provide structural support to hold the fence wire in place.
3 Simple Steps on How To Connect an Electric Fence
Each of these components must be carefully selected based on the size and purpose of the fence to ensure optimal performance and safety. Learn if Dachshunds need special collars to provide the right support and comfort for their unique body shape. Here’s how to connect an electric fence:
Step 1: Choose the Right Energizer
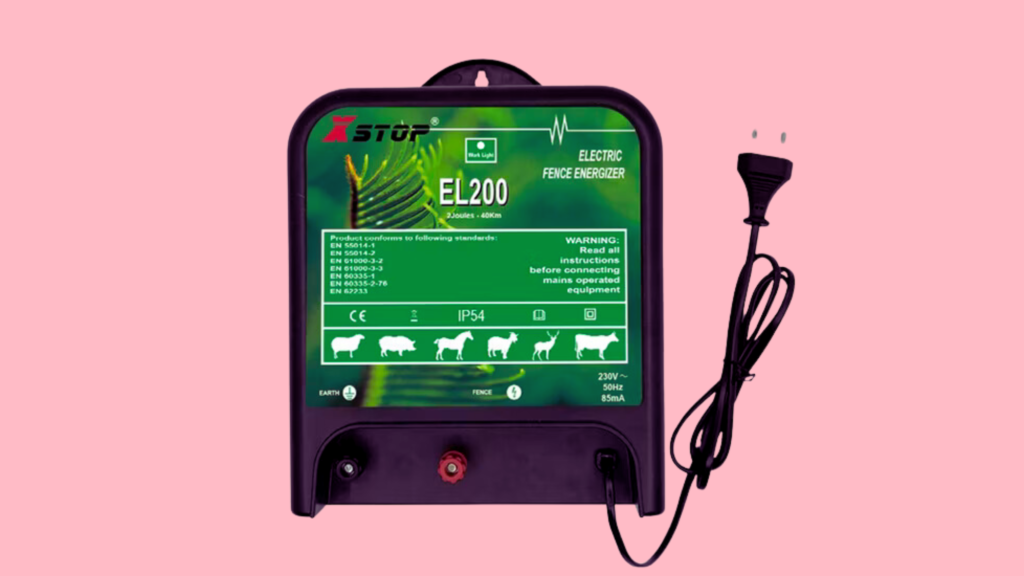
The energizer, also known as the charger, is the power source of the electric fence. Choosing the right energizer is crucial, as it determines the strength and effectiveness of the shock delivered. A weak energizer may not deter animals effectively, while an excessively strong one can pose unnecessary risks.
When selecting an energizer, consider fence length, animal type, and power source availability. The joule rating (power output) should be sufficient to maintain a strong voltage across the entire fence length, even under challenging conditions such as wet vegetation or long distances. Discover what size collar is best for a French Bulldog puppy to ensure both safety and comfort during their growing stages.
Types of Energizers
There are three main types of energizers, each suited for different setups:
- AC-Powered Energizers: Plug into a standard electrical outlet and provide a continuous power source. Ideal for permanent fencing near homes, barns, or outbuildings where electricity is available.
- Battery-Powered Energizers: Operate on replaceable or rechargeable batteries, making them suitable for remote areas without direct access to power.
- Solar-Powered Energizers: Harness solar energy to charge internal batteries, making them eco-friendly and perfect for off-grid locations. However, they require consistent sunlight to function optimally.
Selecting the Right Power Output
Different fence sizes require different energizer power outputs. Here’s a general guideline:
- Small areas (up to 1 mile): 0.5-1 joule output. Suitable for containing small animals like dogs, poultry, or rabbits.
- Medium areas (1-5 miles): 2-5 joules output. Recommended for livestock such as cattle, horses, and sheep.
- Large areas (5+ miles): 6+ joules output. Necessary for large properties or areas with heavy vegetation that can drain voltage.
Choosing the right energizer ensures that the fence remains effective, reliable, and capable of handling environmental challenges. Understand if French Bulldogs can wear dog collars and how it affects their neck structure and overall health.
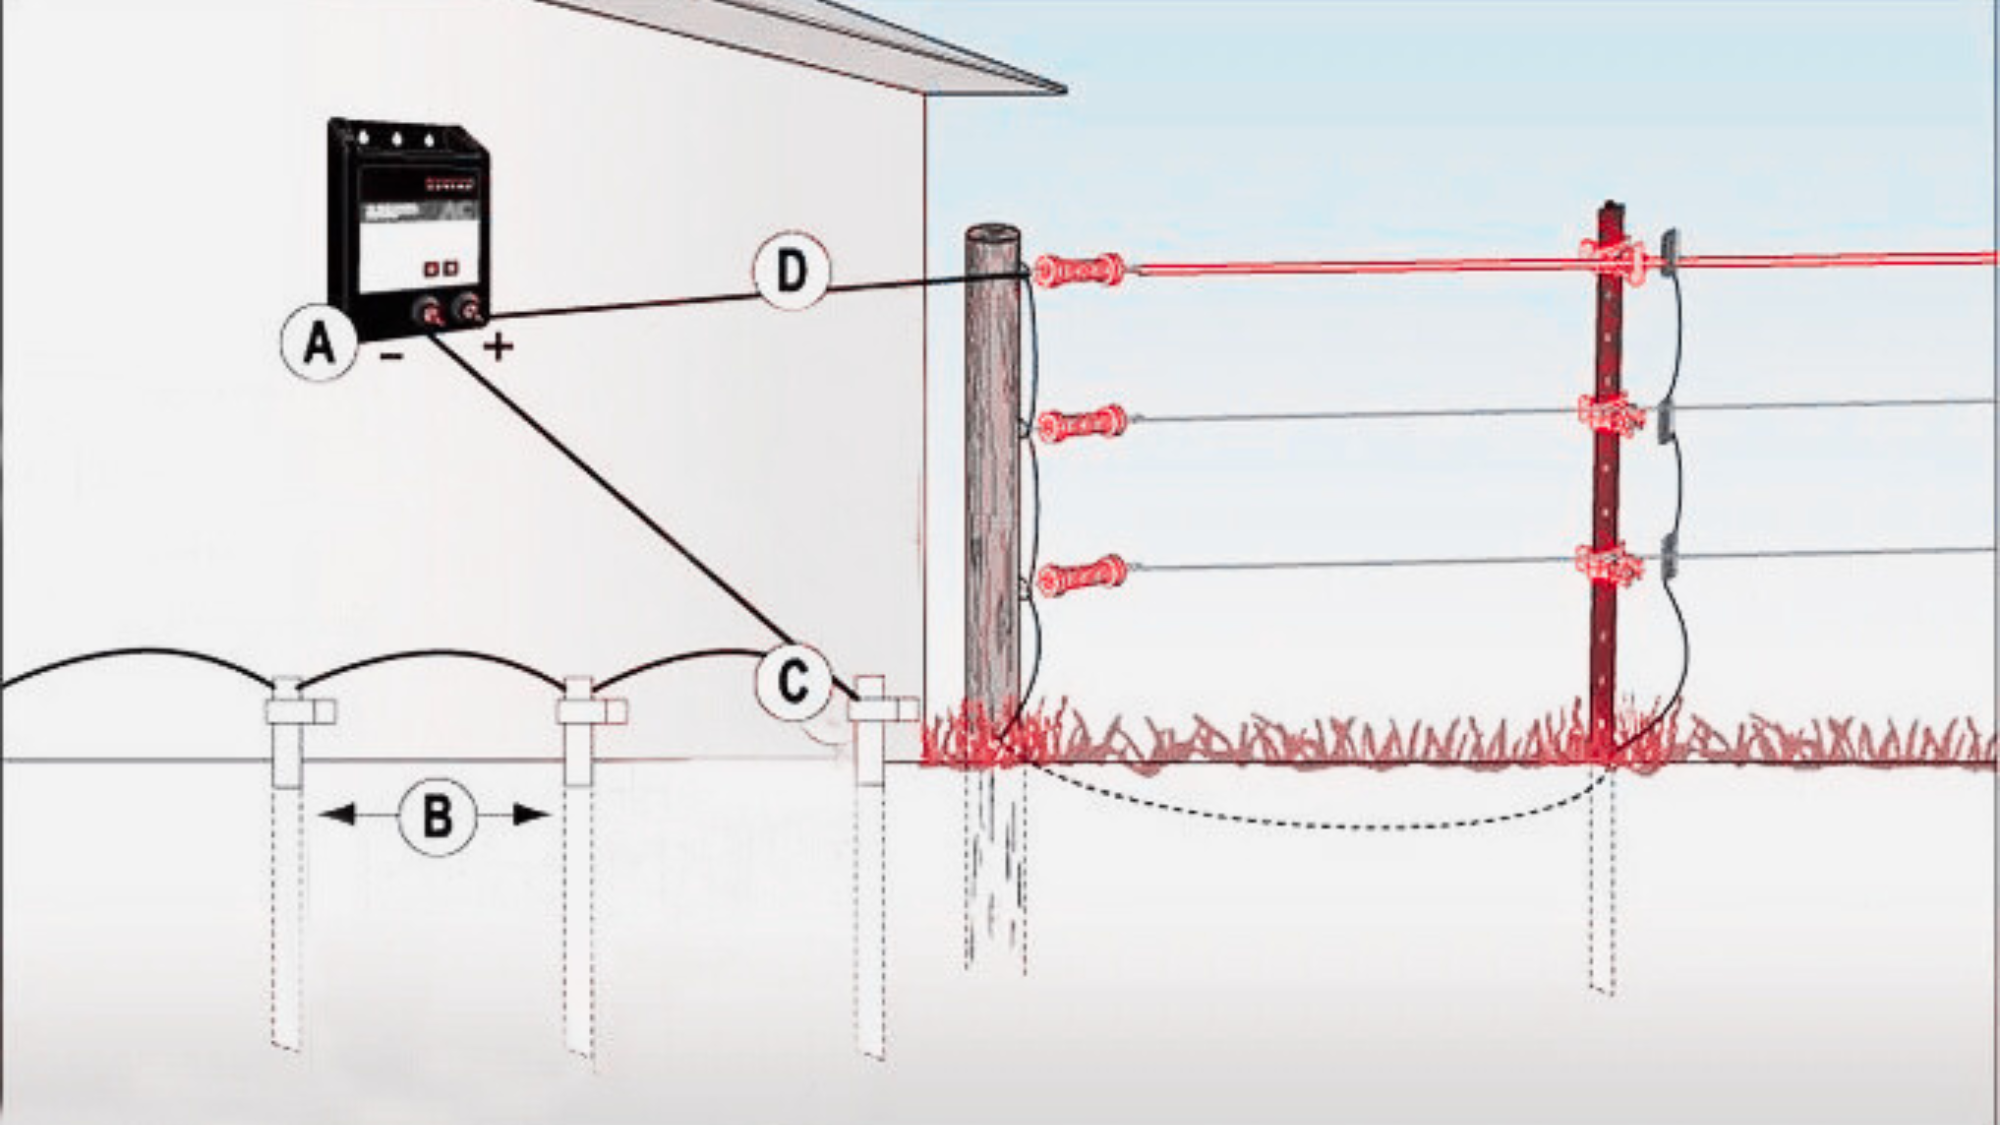
Step 2: Install the Grounding System
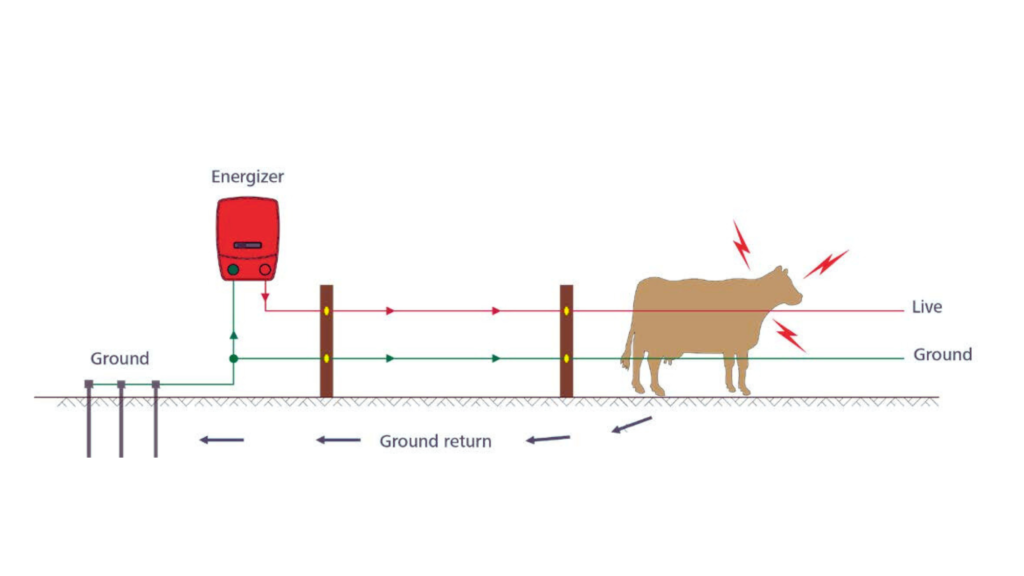
Grounding is the most critical step in setting up an electric fence. Without proper grounding, the fence will not function correctly—even with a powerful energizer. The grounding system provides a return path for electricity, allowing the pulse to complete the circuit when an animal or intruder touches the fence.
Inadequate grounding is the most common cause of electric fence failure. A poorly grounded system will result in weak shocks or no shock at all, rendering the fence ineffective.
How to Install Grounding Rods
- Choose the Right Rods: Use 6 to 8-foot galvanized steel or copper rods. Galvanized rods prevent corrosion, ensuring long-term effectiveness.
- Placement: Drive the rods deep into moist soil, at least 10 feet apart from each other, to ensure efficient conductivity. Avoid dry, sandy, or rocky soil, as these conditions reduce effectiveness.
- Connect to Energizer: Use a high-quality insulated wire to link the rods to the energizer’s ground terminal. Ensure firm, corrosion-free connections for reliable performance.
- Additional Rods: For larger fences or higher voltage needs, install 3 or more rods spaced at least 10 feet apart. The more grounding rods used, the better the electrical return path.
Pro Tip: If you’re working in dry or sandy soil, water the ground rods periodically to improve conductivity. Moisture enhances the grounding efficiency, making the fence more effective.
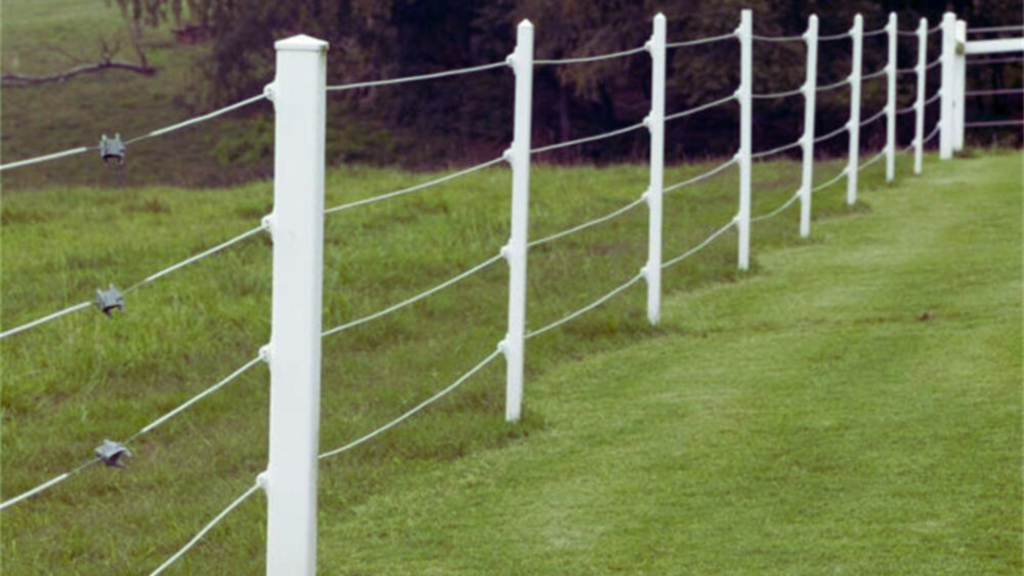
Step 3: Install the Fence Wire
Once the energizer and grounding system are set up, the next step is installing the fence wire. Proper installation ensures consistent voltage flow and maximizes shock effectiveness.
Choosing the Right Fence Wire
The type of wire you select impacts efficiency and durability. Here are the best options:
- Galvanized Steel Wire (12-16 gauge): Highly conductive and durable. Best for permanent fences.
- Aluminum Wire: Four times more conductive than steel but softer, meaning it can stretch over time.
- Polywire or Polytape: Contains conductive metal strands and is ideal for temporary fencing or portable setups. However, it is less conductive than metal wires.
How to Install the Fence Wire
- Attach to Insulators: Run the wire through high-quality insulators attached to fence posts. Insulators prevent energy loss into posts, ensuring high-voltage retention.
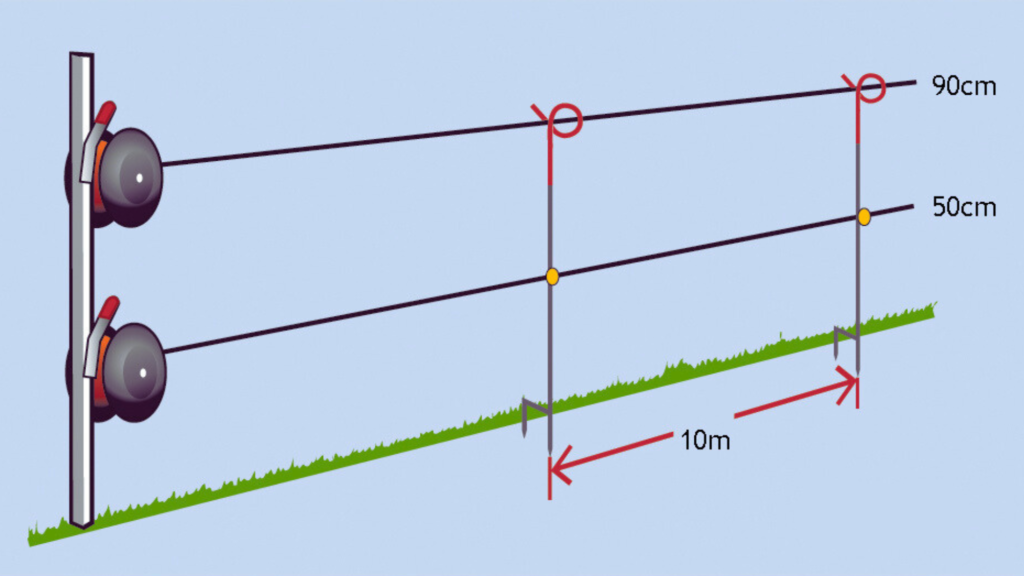
- Wire Spacing: Adjust wire height based on the animals being contained. Cattle require 2-3 wires, while deer need at least 5 wires for effective deterrence.
- Secure the Wire Tightly: Loose wires reduce conductivity and increase power loss. Keep tension even across the fence line for consistent voltage.
Explore the best dog collars for French Bulldogs to keep them comfortable while ensuring durability and style.
Connecting the Energizer
The energizer, also known as the fence charger, is the powerhouse of your electric fence system. It is responsible for converting power into electrical pulses that run through the fence wire, creating the necessary shock to deter animals and intruders. Before connecting the energizer, ensure you have selected the appropriate type—AC (plug-in), DC (battery-powered), or solar-powered—based on your location and power availability.
AC energizers provide the most consistent power but require access to an electrical outlet. Battery-powered units offer mobility but need regular recharging, while solar-powered options are ideal for remote locations, provided they receive adequate sunlight.
To connect the energizer, start by mounting it in a dry, weather-protected area. If using an AC energizer, plug it directly into a grounded electrical outlet. For battery-powered units, ensure the battery is fully charged before connecting it.
If you are using a solar-powered energizer, position the solar panel in a location with maximum sun exposure. Once the power source is secured, attach the positive (red) terminal of the energizer to the fence wire using an insulated cable or lead-out wire. Find the best dog collars for Dachshunds that accommodate their long bodies and prevent strain on their necks.
Then, connect the negative (black) terminal to the grounding system. Before turning it on, double-check all connections to ensure they are tight and secure. Once powered, the energizer will send intermittent pulses through the fence, ensuring that any contact with the wire delivers a controlled but effective shock.
Testing the Fence
After connecting the energizer, it is crucial to test the electric fence to ensure proper functionality. A well-functioning fence should deliver a consistent voltage across all wires without any drops or power losses. Begin testing by using a digital fence tester or a voltage meter designed specifically for electric fencing.
These tools measure the voltage level at different points along the fence and help identify weak spots or faults in the system. Ideally, your fence should register between 5,000 and 9,000 volts, depending on the animals you are containing or deterring. Cattle require around 4,000 to 5,000 volts, while stubborn animals like deer or predators may need 7,000 volts or more.
Find out what color collar looks best on a Rottweiler to complement their bold appearance and highlight their unique features.
Start testing by checking the voltage directly at the energizer’s output terminals. If the reading is significantly lower than the energizer’s rating, the problem may be with the unit itself or the grounding system. Next, test different sections along the fence line to ensure voltage remains consistent. If you notice a drop in voltage at any section, inspect for poor connections, vegetation touching the fence, or damaged insulators.
Additionally, test the grounding system by placing the tester probe near the grounding rods. A properly grounded fence should show minimal resistance. If the voltage drops significantly when touching the ground, you may need to add extra ground rods or improve soil moisture around them for better conductivity.
Maintenance Tips
Regular maintenance is essential to keep your electric fence operating efficiently. Without proper upkeep, issues such as power loss, wire corrosion, and grounding failures can reduce its effectiveness. One of the most important maintenance tasks is checking the fence line for any physical damage.
Walk along the fence at least once a week to inspect for broken wires, loose connections, or snapped insulators. Any damaged components should be repaired or replaced immediately to prevent voltage drops.
Another crucial maintenance practice is keeping the fence line clear of vegetation. Grass, weeds, or branches touching the live wires can create a direct path to the ground, draining power and weakening the shock. Trim vegetation regularly and use herbicides if necessary to maintain a clear fence line. Get insights into what is best for Dachshunds: a collar or harness for their safety, comfort, and health during walks.
Final Thoughts: Ensuring a Powerful and Reliable Electric Fence
A well-connected electric fence enhances security, protects livestock, and deters intruders. By following this step-by-step guide, you ensure that your fence remains effective, safe, and durable. Regular maintenance and testing will keep the system functioning optimally, giving you peace of mind and reliable protection. Hope so, now you know how to connect an electric fence.
To discover what activities bring joy to Australian Cattle Dogs, check out this detailed guide on What Do Australian Cattle Dogs Love. Ready to set up your electric fence? Follow these steps and enjoy a powerful, efficient, and long-lasting system! 🚜⚡