| Summary: A well-wired electric fence ensures effective containment and deterrence by delivering consistent voltage. Key components include an energizer, grounding system, quality fence wire, and insulators. Proper wiring prevents power loss, short circuits, and weak shocks. Avoid common mistakes like poor grounding, vegetation interference, and weak connections for optimal fence performance and safety. |
An electric fence is one of the most effective ways to secure livestock, protect property, and deter predators. It provides a psychological barrier rather than a physical one, delivering a short, harmless, but memorable wiring diagram for electric fence shock that discourages animals and intruders from crossing.
However, the effectiveness of an electric fence is highly dependent on its wiring configuration, power source, and grounding. Without proper wiring, the fence may not deliver enough voltage to deter threats, making it ineffective and unreliable. To find out the what size collar for an Affenpinscher, ensure you measure your dog’s neck correctly for a perfect fit.
| Question | Quick Answer |
| Why is proper wiring important? | Ensures strong voltage, prevents shorts, and keeps the fence effective. |
| Key components of wiring? | Energizer, fence wire, grounding system, and insulators. |
| Best wire type? | Galvanized steel (12-16 gauge) or aluminum for better conductivity. |
| How many grounding rods? | At least 3 rods (6-8 feet long) per joule of output. |
| Common mistakes to avoid? | Poor grounding, weak connections, vegetation touching wires. |
| Ideal voltage range? | 5,000-9,000 volts, depending on the animals to be deterred. |
Why Proper Wiring is Crucial for an Electric Fence
Incorrect wiring can lead to low voltage, short circuits, or even complete system failure, rendering your fence useless. Many people assume that simply connecting a few wires to a power source will suffice, but an electric fence operates as a closed circuit system where the flow of electricity must be properly controlled.
Understanding the correct wiring diagram for electric fence and installation process ensures that your fence delivers the right amount of electrical shock—enough to deter animals and intruders but still safe for both humans and wildlife.
A properly wired electric fence should typically deliver between 5,000 to 9,000 volts, depending on the type of animals or threats it is meant to contain or repel. For example, cattle require around 4,000 to 5,000 volts, while more stubborn animals like deer and predators may need at least 7,000 volts for effective deterrence.
By following a clear and accurate wiring diagram, you can ensure that your fence operates at optimal efficiency, providing security while maintaining safety. For a step-by-step guide on how to wear collar to an Affenpinscher, check out this detailed article to ensure a comfortable and secure fit for your dog.
Wiring Diagram For Electric Fence: Key Components of an Electric Fence Wiring System
Before wiring an electric fence, it is essential to understand the core components and how they work together to create a fully functional system. Each component plays a critical role, and missing or incorrectly installing even one can compromise the fence’s effectiveness.
1. Fence Energizer (Charger) – The Heart of the System

The fence energizer, also known as a fence charger or controller, is the heart of the electric fencing system. It is responsible for sending electrical pulses through the fence wire at regular intervals, usually every 1 to 2 seconds. The strength of the electric pulse is measured in joules, and selecting the correct output level is crucial for ensuring that the fence is both effective and safe.
The power output of an energizer should match the size and length of your fence. A small electric fence covering under 1 mile typically requires a 0.5 to 1 joule energizer. Medium fences spanning 1 to 5 miles need 2-5 joules, while large electric fences covering over 5 miles should use at least 6 joules for proper performance. Using an undersized energizer can lead to inconsistent shocks, making the fence ineffective.
Energizers can be powered by AC (plug-in), DC (battery), or solar energy. Plug-in models offer consistent power but require an electrical outlet, while battery-powered energizers provide mobility but require frequent recharging. Solar-powered chargers are ideal for remote locations but depend on sufficient sunlight to maintain voltage levels. Choosing the right power source ensures that the fence remains operational 24/7.
2. Fence Wire – Conducting the Electric Current
Fence wire is responsible for carrying the electrical charge from the energizer to the animal or intruder. The type of wire used affects the efficiency of the system, as different materials offer varying levels of conductivity and durability. Selecting the wrong type of wire can lead to significant power loss, reducing the effectiveness of the fence.
Common fence wire options include:
- Galvanized steel wire (12-16 gauge) – Offers excellent conductivity and durability, making it a popular choice for permanent electric fences.
- Aluminum wire – Conducts electricity four times better than steel but is softer and more prone to stretching, requiring frequent tension adjustments.
- Polywire or Polytape – Best suited for temporary electric fences or areas where visibility is essential. However, it has lower conductivity and may require closer wire spacing for effectiveness.
For optimal results, wires should be spaced 12 to 24 inches apart, depending on the type of animals being controlled. For example, a fence designed to contain horses should have 3-4 wires spaced at 18-inch intervals, while a cattle fence typically requires 2-3 wires placed 24 inches apart.
3. Grounding System – Completing the Circuit
A proper grounding system is the most overlooked part of electric fencing, yet it is essential for ensuring that the system works effectively. Without adequate grounding, the electrical circuit remains incomplete, resulting in a weak or nonexistent shock.
Grounding rods should be:
- At least 6-8 feet long to ensure proper contact with the soil.
- Driven into moist soil, as dry or sandy soil reduces conductivity.
- Placed at least 10 feet apart if multiple rods are used, with at least 3 rods for every 1 joule of output.
For large electric fencing systems, using additional grounding rods can improve system performance. Testing the grounding system regularly ensures that the fence delivers consistent shock levels.
4. Insulators – Preventing Energy Loss
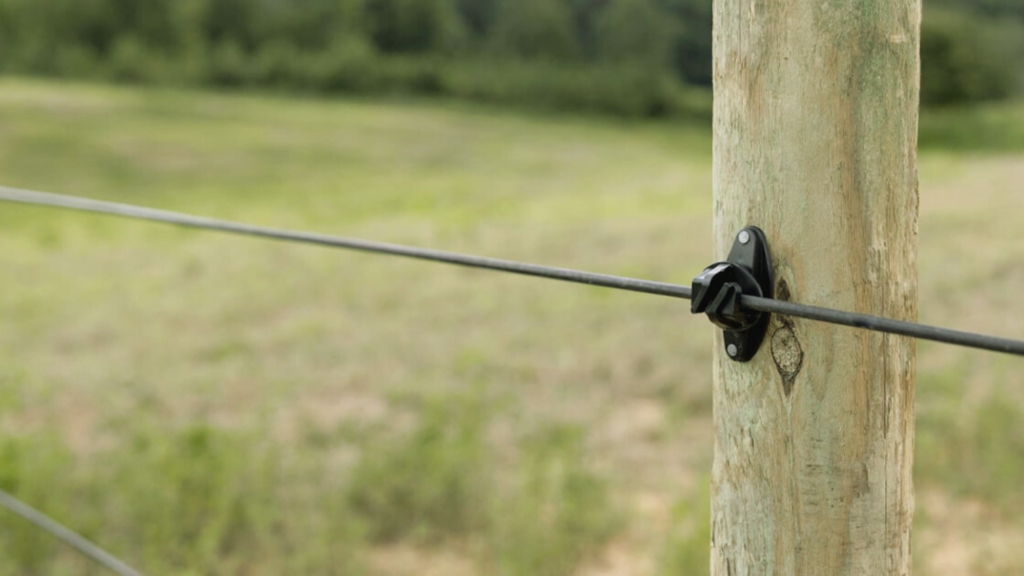
Insulators are used to prevent energy from leaking into fence posts, especially when using wooden or metal posts. Without insulators, the electricity in the fence wires could be drained into the ground, significantly reducing shock strength.
High-quality insulators can reduce energy loss by up to 40%, ensuring that the electric pulse remains strong. Insulators come in various designs, including claw, ring, and tube insulators, each suited for different fence post types. Choosing the right insulators ensures that the fence wire remains properly electrified at all times.
Check out the best dog collars for Border Collie to find durable, stylish, and comfortable options for your active dog.
Wiring Diagram for an Electric Fence (Step-by-Step)
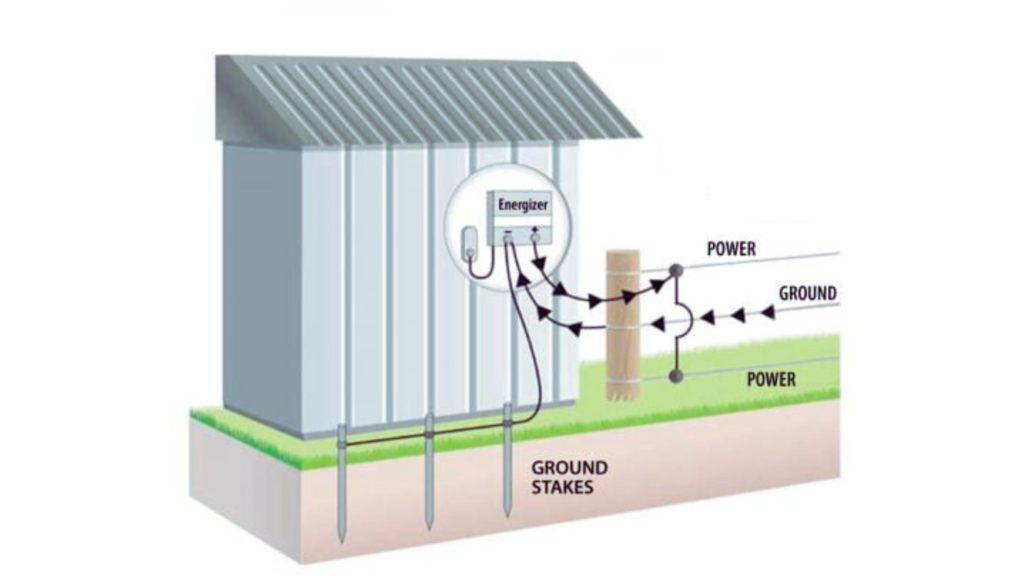
1. Basic Wiring Diagram for a Single-Wire Electric Fence
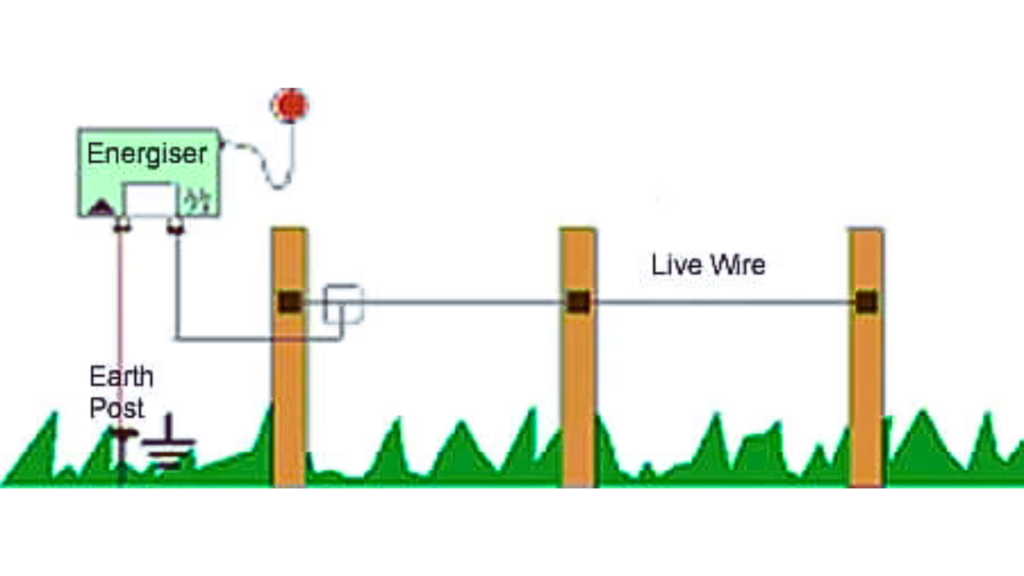
A basic electric fence system includes:
- Energizer: Connected to the power source and sends electrical pulses.
- Grounding system: Linked to the ground terminal to complete the circuit.
- Fence wire: Connected to the positive output of the energizer.
- Insulators: Placed on fence posts to keep wires from touching conductive materials.
Diagram Overview:
[AC/DC/Solar Power] → [Energizer (+ Terminal)] → [Fence Wire] → [Animal Touches Fence] → [Electric Shock] → [Ground Rod] → [Energizer (- Terminal)]
The system completes the circuit when an animal touches the fence wire, receiving a mild shock that deters them from crossing.
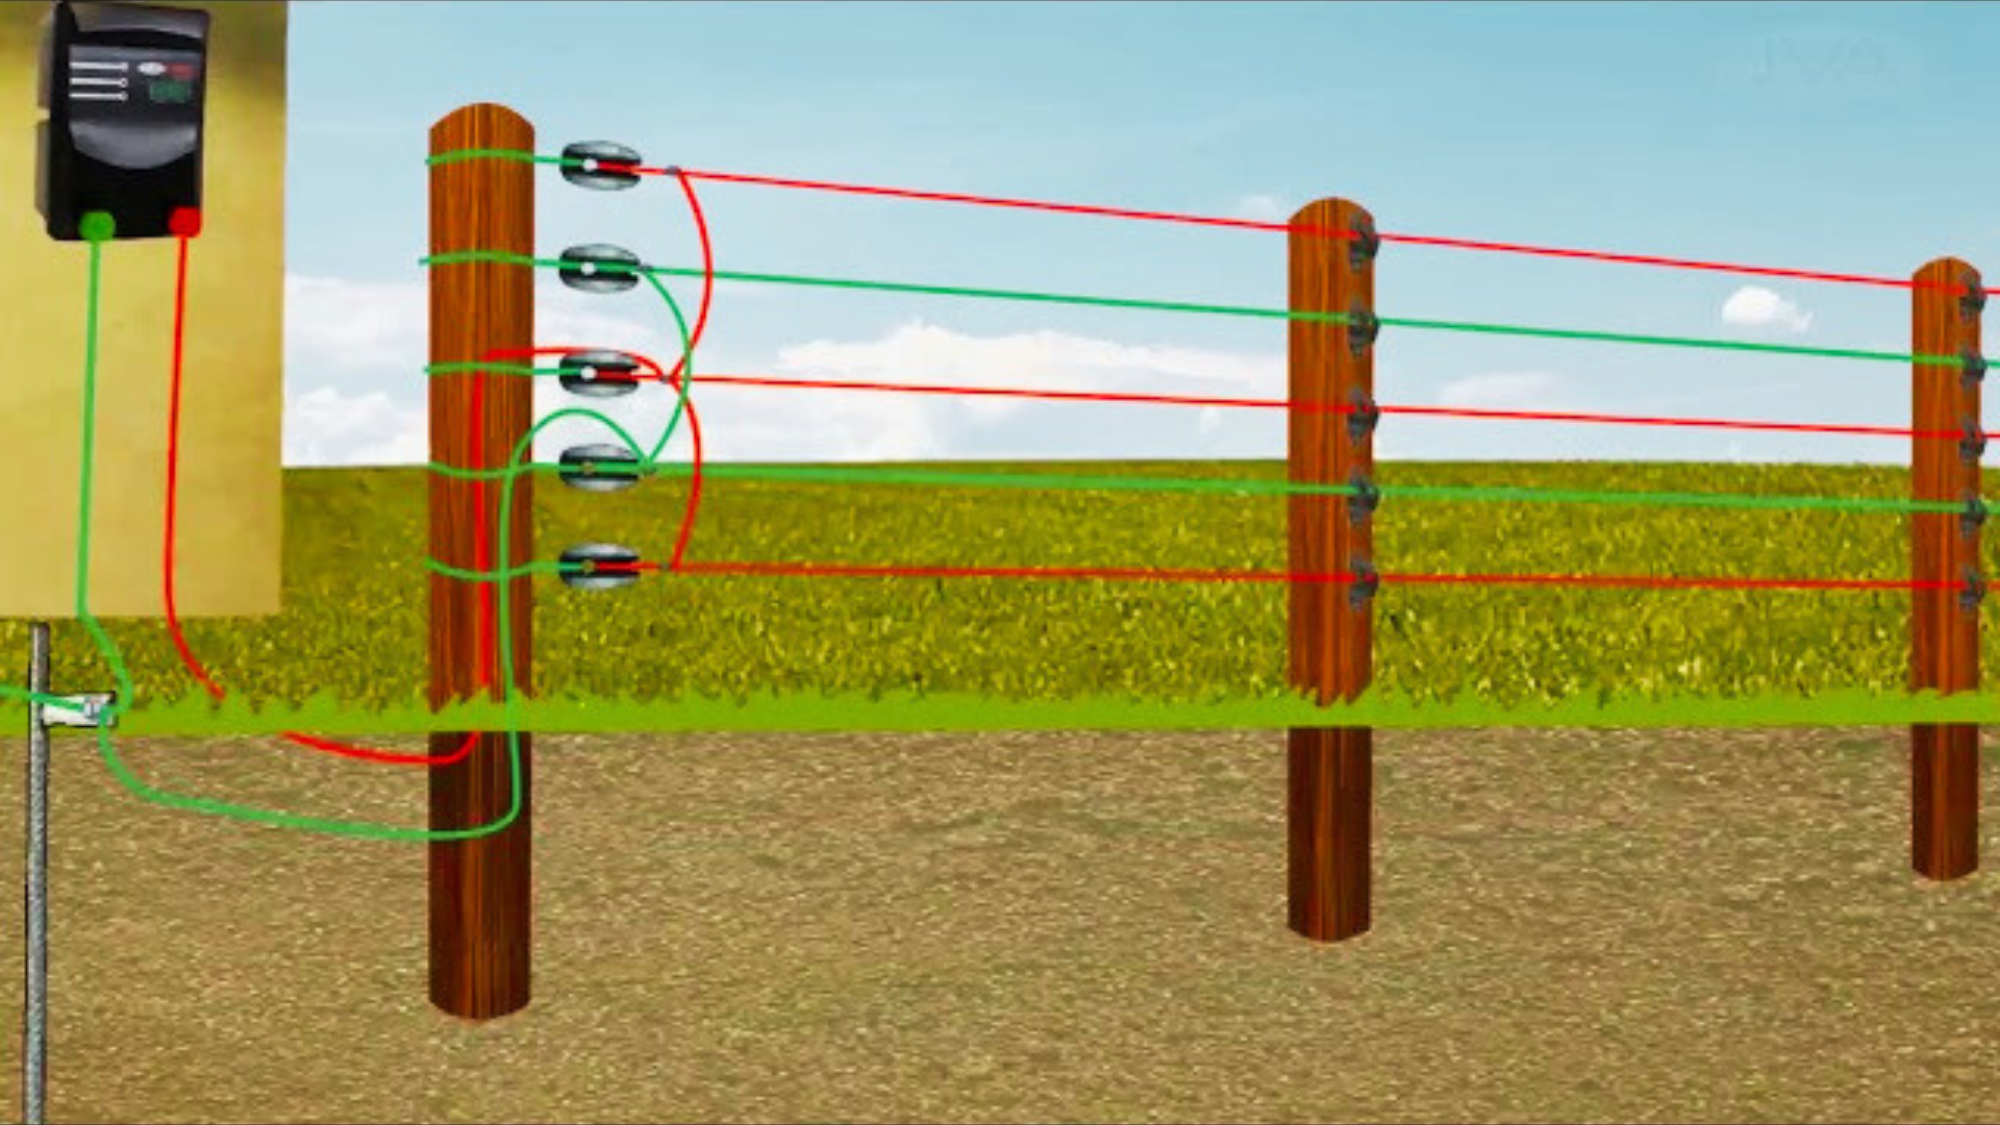
2. Wiring for a Multi-Wire Electric Fence
For stronger security, a multi-wire setup can be used:
- Wire 1 (Top, Hot Wire): Electrified and placed at 4 feet height for large animals.
- Wire 2 (Middle, Hot Wire): Electrified at 2 feet height for medium-sized animals.
- Wire 3 (Bottom, Ground Wire): Placed close to the ground to improve shock delivery.
This system ensures that animals of different sizes make proper contact with the hot wires, delivering a consistent shock.
Diagram Overview:
[Energizer] → [Top Hot Wire] → [Middle Hot Wire] → [Ground Wire] → [Animal Touches Wire] → [Ground System] → [Energizer]
This setup is ideal for cattle, horses, and wildlife control, as it covers different heights effectively.
3. Common Wiring Mistakes and How to Avoid Them
Setting up an electric fence might seem straightforward, but even a small mistake in wiring can render the system ineffective. Many fence failures are due to simple wiring errors that lead to power loss, short circuits, or inadequate shock delivery. Understanding and avoiding these common mistakes can save you time, effort, and money while ensuring your fence functions optimally.
1. Insufficient Grounding – The #1 Cause of Weak Shock
One of the most overlooked aspects of electric fence wiring is grounding. A poorly grounded fence will result in weak shocks, or worse, no shocks at all. Since the grounding system completes the circuit, at least three 6-8 foot ground rods should be installed at least 10 feet apart and driven deep into the soil. The more joules your energizer outputs, the more grounding rods you need.
For example, a 1-joule energizer requires at least three ground rods, while a 5-joule energizer should have five to six rods for optimal performance. Moist soil conducts electricity better than dry soil, so if you’re installing the fence in an arid region, watering the ground rods periodically can help improve conductivity.
2. Using Low-Quality or Incorrect Wire
Not all wires are created equal when it comes to electric fencing. Many people use barbed wire or standard steel wire, assuming it will work, but these materials have high resistance and poor conductivity. Instead, use 12- to 14-gauge galvanized steel wire for long-term durability and efficient current flow. Aluminum wire is another excellent choice as it conducts electricity four times better than steel, though it is softer and may need frequent tension adjustments.
Polywire and polytape are great for temporary fencing but have significantly lower conductivity compared to metal wires. If using poly-based materials, ensure they contain at least six strands of conductive metal to maintain proper voltage levels.
3. Poor Connections and Energy Loss
Loose or improper connections are another common problem that reduces the efficiency of an electric fence. Every connection point should be secure, rust-free, and properly tightened to avoid energy leaks. If you’re using wire connectors, ensure they are made from conductive metals like copper or stainless steel to prevent power loss.
Many electric fences lose 30-40% of their power due to poor wire splicing or weak energizer-to-fence connections. To test for voltage drops, use a digital fence tester to check the voltage along different fence sections. If voltage is significantly lower at a certain point, inspect the wiring for loose connections or corrosion.
4. Allowing Vegetation to Touch the Fence
Grass, weeds, and shrubs touching the live wire create a direct path to the ground, draining power from the fence and reducing the shock strength. Regularly trim vegetation around the fence line and use herbicide treatments if necessary. A heavily vegetated fence line can cause up to 70% power loss, making the fence ineffective.
By addressing these common mistakes, you can ensure your electric fence operates at full efficiency, keeping animals contained and intruders out. For guidance on choosing the right collar size for an Airedale puppy, check out this detailed guide.
Final Thoughts: Why Proper Wiring Matters for an Electric Fence
A well-wired electric fence is one of the most effective ways to secure livestock, deter predators, and protect property. With the correct wiring diagram for electric fence, proper grounding, and high-quality materials, your fence can deliver consistent and safe electrical shocks that serve as a strong deterrent. For insights on whether Airedales are good off-leash, explore this comprehensive article.